Automation

Autotasks by date

Automatically create tasks from values in Date fields—before or after the date, with a day offset and recalculation when the date changes.

Features

Tasks tied to any date field
Tasks N days before or after the date
Automatic recalculation when the date changes
Task type, text, assignee and deadline
Optional instant task when the date is set

Installation and setup guide

Detailed guide for working with widget "Autotasks by date"

How the widget works

Auto-tasks by date is a widget for automatically creating tasks based on values ​​in “Date” fields in Kommo.

The widget allows you to automatically create tasks relative to the date specified in a custom field of the “Date” type.

Basic operating principle:

  1. You select a field of type “Date” (for example, “Delivery date”, “Contract end date”, “Call date”)
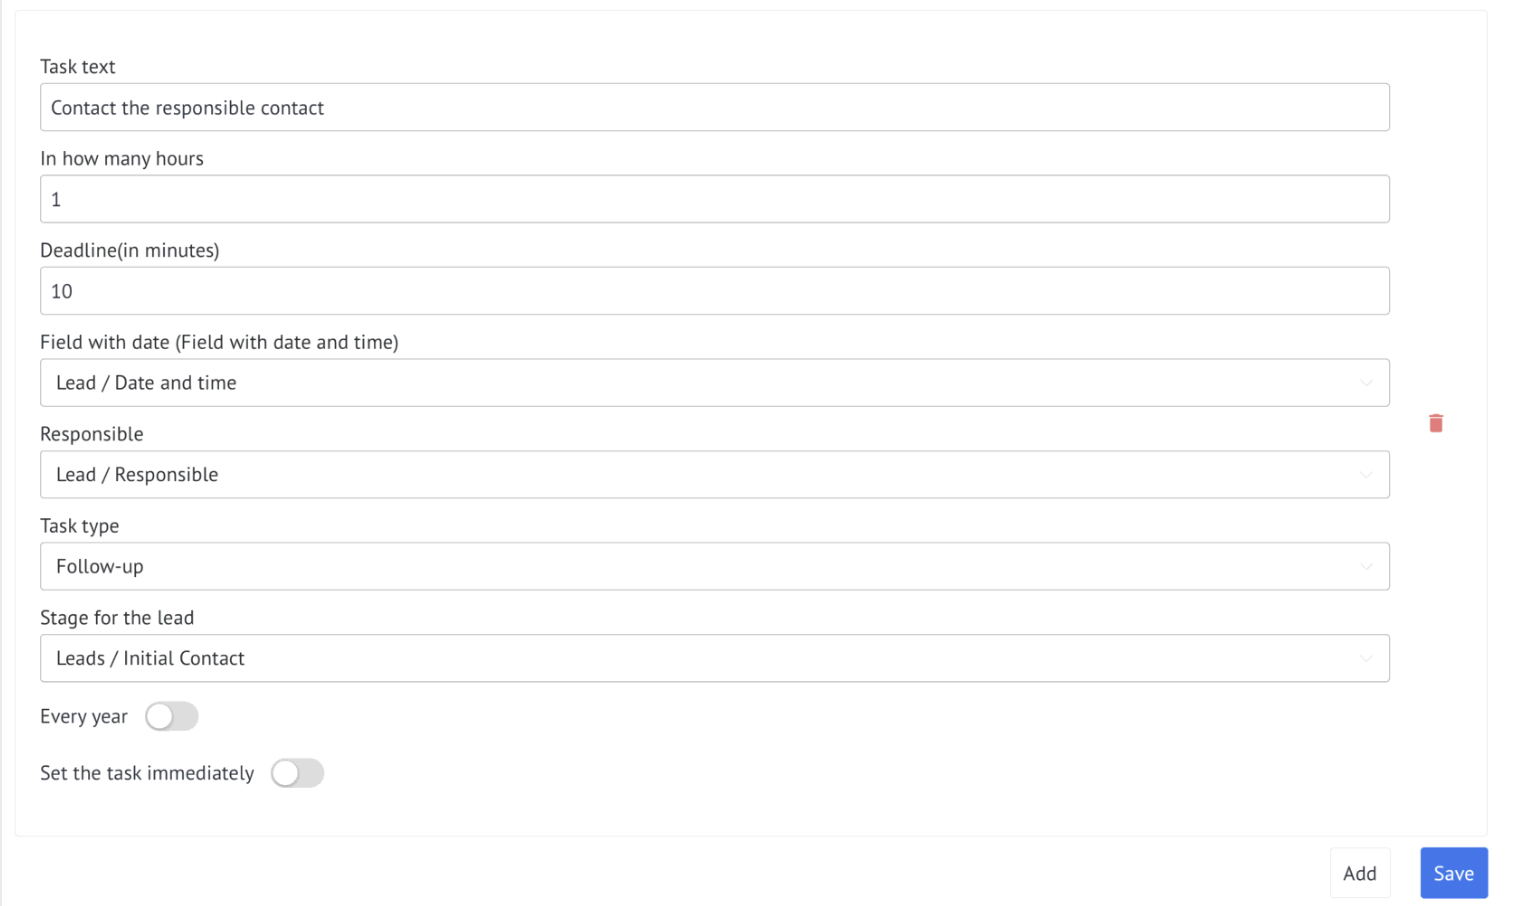
  2. Set up a shift relative to this date (for example, 3 days before the date or 5 days after)
  3. Specify task parameters (type, text, responsible person, due date)
  4. After saving, the rule starts working based on the value of the date field

📌 Usage example: You have a field “Date of delivery of goods”. You want the manager to call the customer 1 day before delivery to confirm. The widget will automatically create a “Confirm Delivery” task 1 day before the specified delivery date.

Key Features

The widget provides the following features:

  • Tasks relative to a date - works with custom fields of the “Date” type
  • Flexible shift settings - set tasks N days before the date or N days after
  • Setting task parameters - select task type, text, person responsible and due date
  • Trigger “Set task immediately” - a separate mode for creating a task when filling out the date field
  • Working with multiple dates - you can set up different autotasks for different date fields

Examples of use

Situations where the widget is especially useful:

🔹 Delivery Reminders
Field: “Delivery Date”
Setting: 1 day before the date → Task “Confirm delivery with customer”

🔹 Contract renewal
Field: “Contract expiration date”
Settings: 7 days before the date → Task “Contact the client to renew the contract”

🔹 Payment control
Field: “Payment date”
Setting: 1 day after the date → Task “Check receipt of payment”

🔹 Scheduling meetings
Field: “Meeting date”
Settings: 3 hours before the date → Task “Call the client to remind about the meeting”

🔹 Sending documents
Field: “Signing date”
Settings: 2 days before the date → Task “Prepare and send documents for signature”

Widget setup

After installing the widget, go to settings:

In the widget settings you will see a form for creating autotask rules:

Basic settings:

  1. Date field - select a custom field of the “Date” type for which tasks will be created
  2. How many hours before—specify how many hours before (positive value) or after (negative value) the task should be created
  3. Task type - select a task type from the list available in your CRM
  4. Task text - describe the essence of the task to be completed
  5. Responsible - select the user to whom the task will be assigned
  6. Task due date - specify the duration of the task in minutes

Once you have configured all the settings, click Save.

Setting How many hours

How to correctly set up a task regarding a date:

📅 Tasks BEFORE date (positive values):

  • 24 hours - the task is created 1 day before the specified date
  • 72 hours - the task is created 3 days before the date
  • 168 hours - the task is created a week before the date

📅 Tasks AFTER the date (negative values):

  • -24 hours - the task is created 1 day after the date
  • -72 hours - the task is created 3 days after the date
  • -168 hours - the task is created a week after the date

Important: The task creation time will correspond to the time specified in the date field, plus/minus the specified number of hours.

Trigger "Set task immediately"

Features of the “Set task immediately” trigger:

This mode allows you to create a task immediately after filling in the date field, rather than waiting for the calculated date to arrive.

How it works:

🔹 Normal mode (without the “immediate” trigger):
If you set a task 1 day before the date with a deadline of 0 minutes, then 1 day before the specified date the system will set a task with a deadline of 0 minutes (i.e. the task will immediately be overdue).

🔹 "Set a task immediately" mode:
If you enable the "set a task immediately" trigger, the task is created after filling out the date field and checking with the widget (the speed of setting depends on the number of deals in the stage and the number of rules in the settings). The task due date will be set to the date from the field + the specified task due date. If the due date is 0, then the task due date will be set exactly to the date in the field.

Examples:

  • Field “Delivery date” = January 15, task deadline = 2 hours, “immediate” trigger is enabled → The task is created immediately with a deadline of January 15 + 2 hours
  • Field “Meeting date” = January 20, task deadline = 0 minutes, “immediate” trigger is enabled → The task is created immediately with a deadline of exactly January 20

When to use: The “immediate” trigger is convenient when you need to immediately record a task in the system, but with a deadline tied to a future date.

Working with Multiple Rules

Multiple autotasks

You can create multiple rules for a single date field, or set up different rules for different fields.

Combination examples:

🔹 Several tasks for one date:

  • 7 days before the delivery date → Task “Prepare goods for shipment”
  • 1 day before the delivery date → Task “Call the client to confirm”
  • On the day of delivery → Task “Send goods”
  • 1 day after delivery → Task “Check delivery status”

🔹 Different fields with dates:

  • Field “Payment date” → 1 day before the date → Task “Remind about payment”
  • Field “Meeting date” → 3 hours before the date → Task “Call to confirm the meeting”
  • Field “Contract expiration date” → 14 days before the date → Task “Prepare a commercial proposal for renewal”

✅ All rules work independently of each other and can be customized for different scenarios of working with clients.

Recommendations for use

Tips for working effectively with the widget:

  • Use clear task names - indicate exactly what needs to be done and for what transaction
  • Assign tasks to the right people responsible - you can assign them to the person responsible for the transaction or to a specific employee
  • Consider working hours - set realistic deadlines taking into account employees’ working hours
  • Combine with other widgets - for example, use together with the “Auto tasks” widget for comprehensive automation
  • Check your settings regularly - make sure all rules are up to date and consistent with current business processes
  • Test on test transactions - before mass use, check the operation of the rules on individual transactions

Frequently Asked Questions

❓ What happens if the date in the field is not filled in?

The task will not be created until the date value appears in the field.

❓ Is it possible to use hours and minutes for shifting?

Yes, the widget supports setting the shift not only in days, but also in hours and minutes. This allows you to create tasks, for example, 3 hours before the event.