Payments

Asaas

Asaas payment links for Kommo invoices: card, Pix and boleto (Brazil, BRL).

Features

Payment links for Kommo invoices
Card, Pix and boleto (BRL, Brazil)
Trigger and Salesbot
Invoice marked as paid after payment

Installation and setup guide

Detailed guide for working with widget "Asaas"

ℹ️If you don’t yet have an Asaas account, register. For tests, use the Asaas sandbox.

What the widget does

The widget Asaas payments by NOVA creates Asaas payment links for Kommo invoices. It is for Brazil and the currency BRL. The customer pays by card, Pix or boleto.

You can create a link manually in the invoice, automatically with a trigger at a pipeline stage, or with a Salesbot step. After payment the invoice is marked as Paid and the Paid, Asaas field in the lead is filled.
Installation

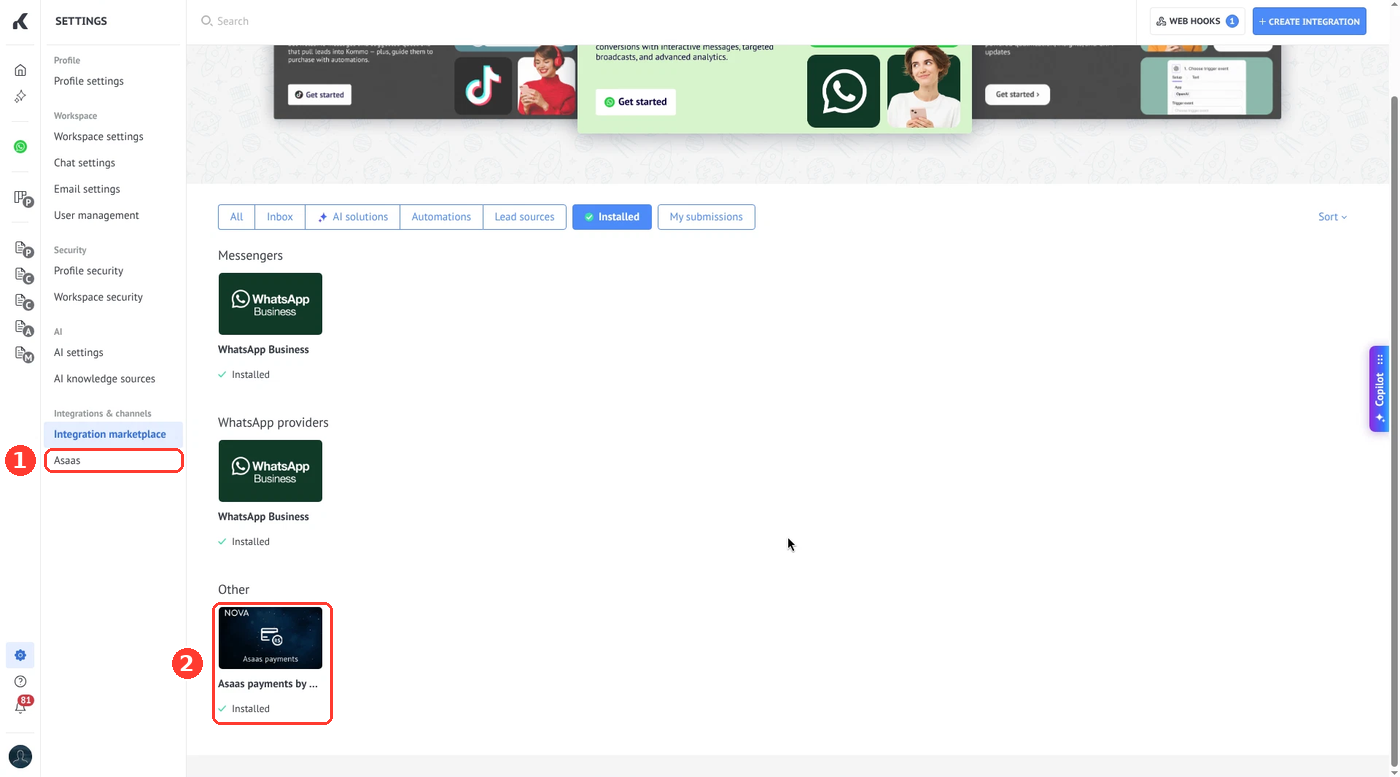
  1. In Kommo, open Settings → Integrations & channels (Integration marketplace).
  2. Find the widget Asaas payments by NOVA and install it. Allow the requested access.
  3. Open the widget settings. The settings page is at /settings/widgets/nova_asaas/ in your account.
Kommo Integrations & channels: Asaas in the left menu and the installed Asaas payments by NOVA tile

Widget settings

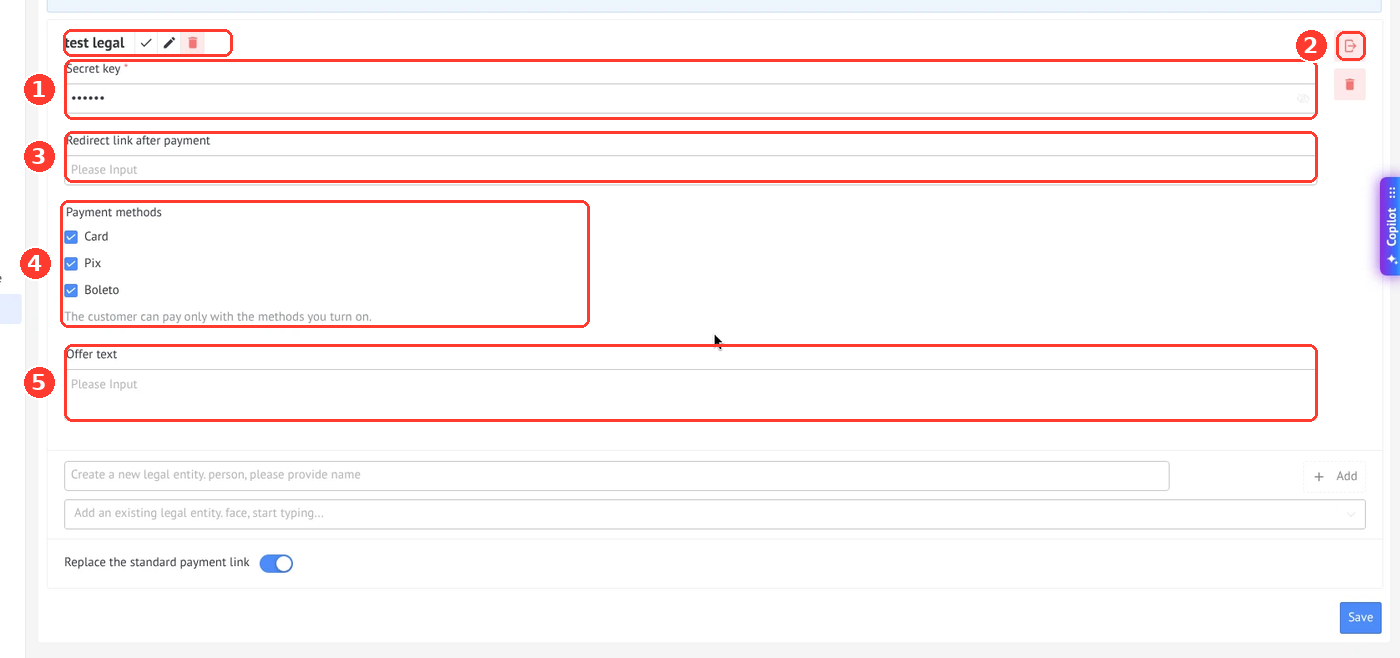
Add a legal entity (supplier) in the widget settings and fill in its fields:

  • Secret key — the Asaas API key of this legal entity. After you paste it, click Authorize. The widget checks the key. To disconnect, click Log out.
  • The widget has no sandbox switch. A sandbox key (it starts with $aact_hmlg_) works with the Asaas sandbox; a production key (it starts with $aact_prod_) works with production. Do not mix a key and an environment.
  • Redirect link after payment — optional URL the customer is sent to after a successful payment.
  • Payment methods — checkboxes Card, Pix and Boleto. By default only Card is on. Turn on the methods you want to accept; at least one is required. The customer can pay only with the methods you turn on. If several methods are on, the customer chooses on the Asaas payment page.
  • Offer text — optional text for this legal entity.

If you don’t have an Asaas account yet, use the Register button at the top of the settings.

Asaas widget settings: legal entity, Secret key, Redirect link after payment, Payment methods Card / Pix / Boleto, Offer text

Getting the secret key

The secret key is created in the Asaas web interface (not in the mobile app). Only account administrators can create it. The official guide is on the Asaas API keys page.

  1. Sign in to Asaas: production — www.asaas.com, tests — sandbox.asaas.com. The sandbox account is separate from production.
  2. Open the user menu (profile icon) → Integrações (Integrations).
  3. Open the Chaves API (API Keys) tab and click Gerar chave de API (Generate API key).
  4. Copy the key immediately: Asaas shows it only once. The key starts with $aact_.
  5. In the widget settings, paste the key into Secret key and click Authorize. If the check fails, the widget shows “Could not verify the key”.

⚠️Treat the key as a password. Do not send it in chat and do not leave it visible on screenshots. If you lose it, generate a new key in Asaas.

Invoices and a manual payment link

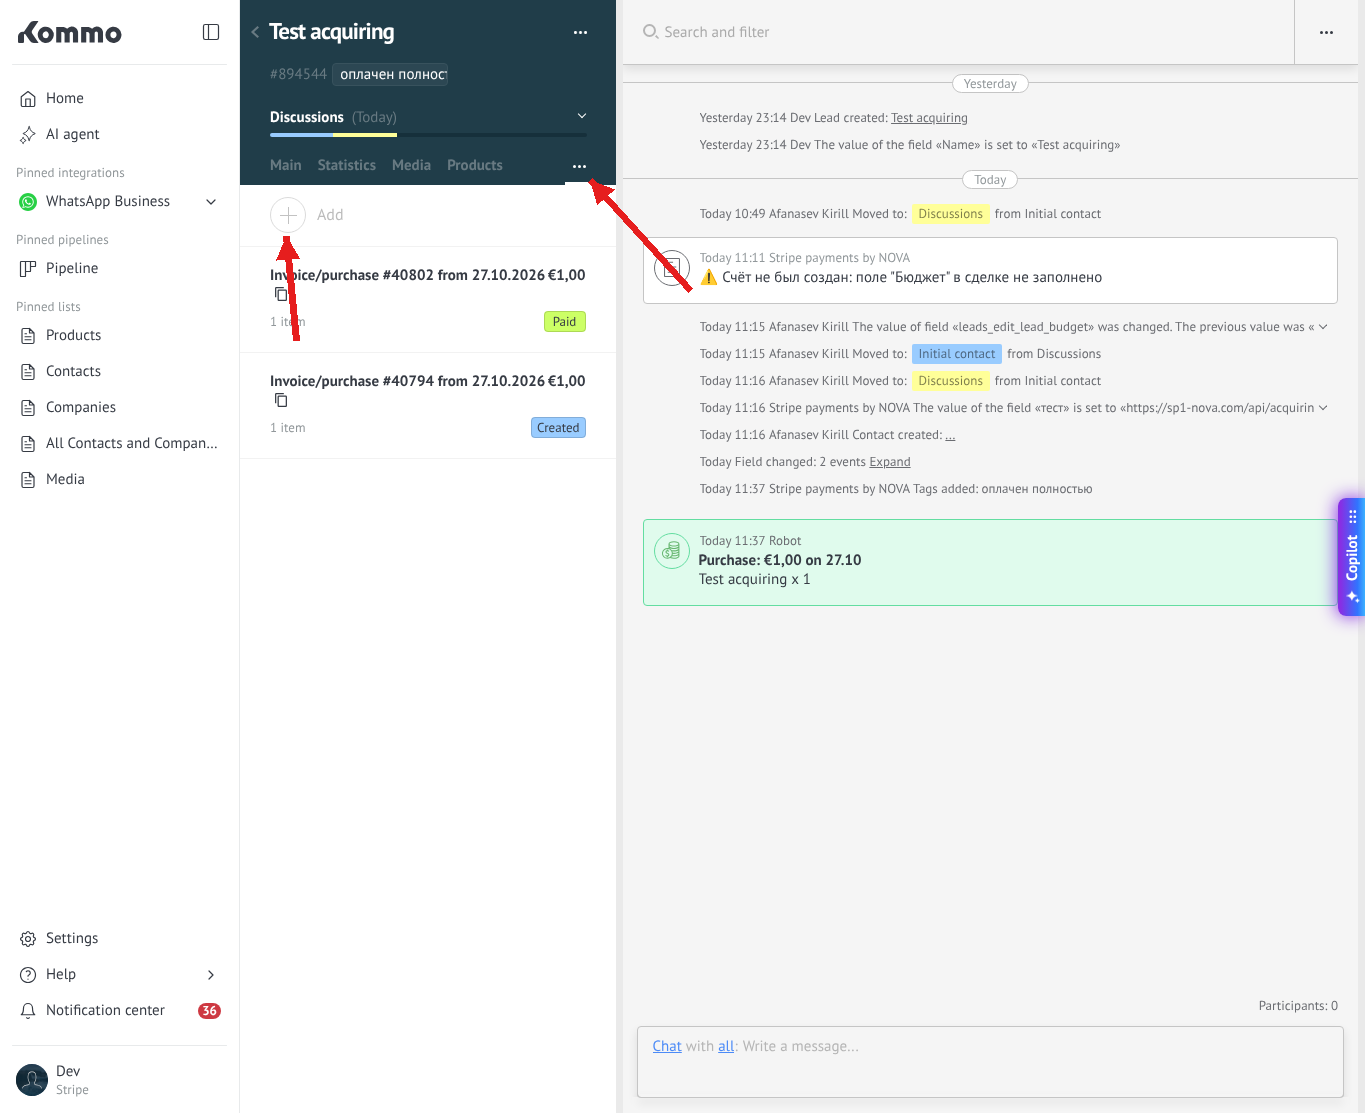
Invoices are created and opened in the lead card, on the Invoices/purchases tab (it is also in the «…» menu of the lead). There is no separate invoice option in the widget settings. Invoice currency is BRL.

How to create an invoice and get a link

  1. Open the lead card.
  2. Open the «…» menu and choose Invoices/purchases, or open that tab.
  3. Click + Add.
  4. Fill in the payer, the supplier (your legal entity) and the line items, then save the invoice.
Lead card: Invoices/purchases tab and the + Add button

The payment link appears on the invoice and as a note in the lead feed. Send this link to the customer. The customer opens it and pays on the Asaas page.

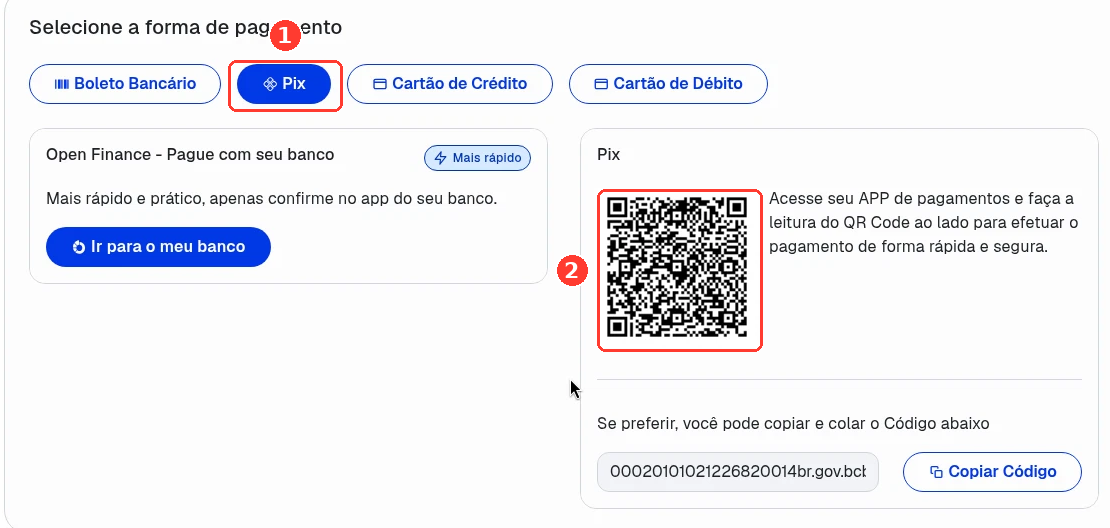
Depending on the payment method, the Asaas page shows a card form, a Pix QR code and “copia e cola” code, or a boleto with a barcode. If several methods are enabled, the customer can switch tabs on that page. A Pix link may open on the Boleto tab; switch to Pix to see the QR code. A boleto page can also have a Pix tab — this is how Asaas works, not a widget error.

Asaas payment page: card, Pix (QR and copia e cola) or boleto

Trigger at a pipeline stage

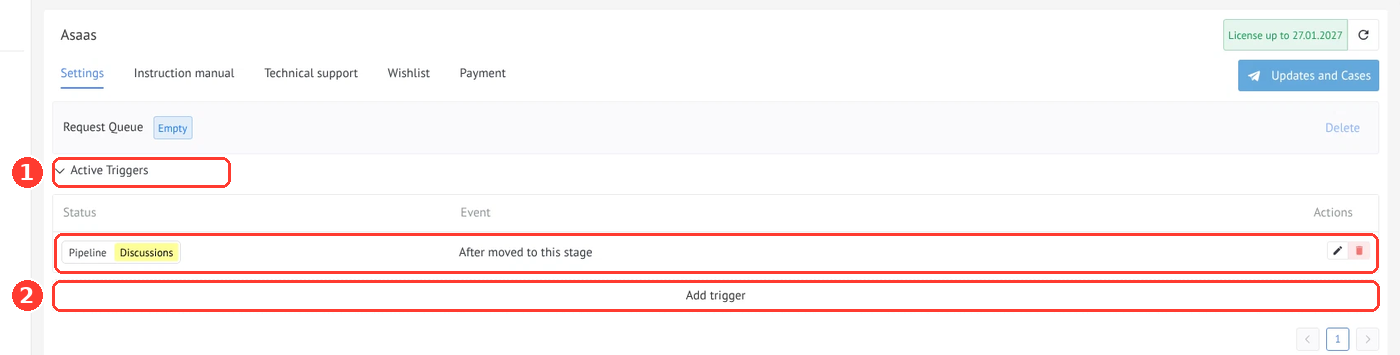
To create a payment link automatically when a lead reaches a stage, add an Asaas trigger. You can add it in the widget settings, under Active Triggers → Add trigger, or in the pipeline settings on that stage.

Widget settings: Active Triggers and Add trigger

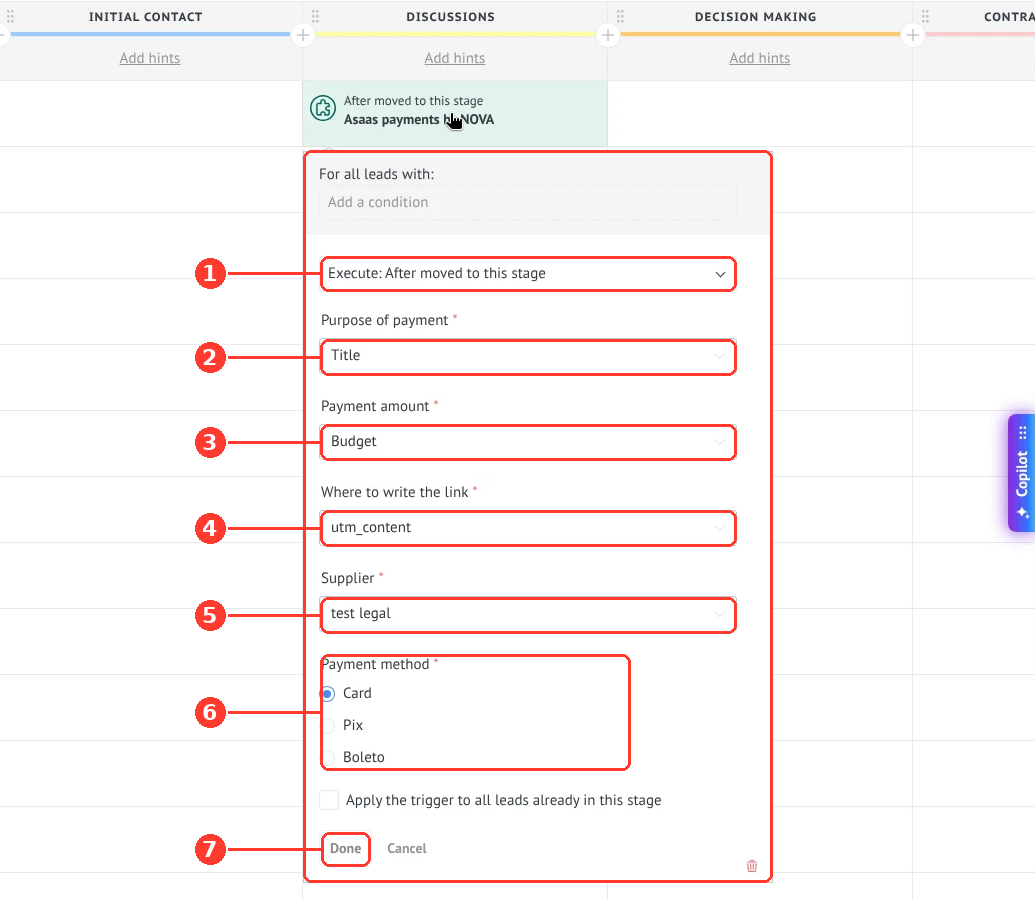
In the trigger window, fill in the fields:

  • Execute — when the trigger runs, for example “After moved to this stage”. This is a standard Kommo field. You can also set a condition under “For all leads where”.
  • Purpose of payment (required) — the lead field to take the purpose from, for example Title.
  • Payment amount (required) — the field with the amount, for example Budget.
  • Where to write the link (required) — the lead field where the payment link will be written.
  • Supplier (required) — the legal entity whose Asaas key will be used.
  • Payment method (required) — Card, Pix or Boleto.
Editing trigger: Execute, Purpose of payment, Payment amount, Where to write the link, Supplier, Payment method

Save the trigger. When it runs, the widget creates a Kommo invoice and writes the payment link to the selected field and to a note on the lead.

Salesbot step

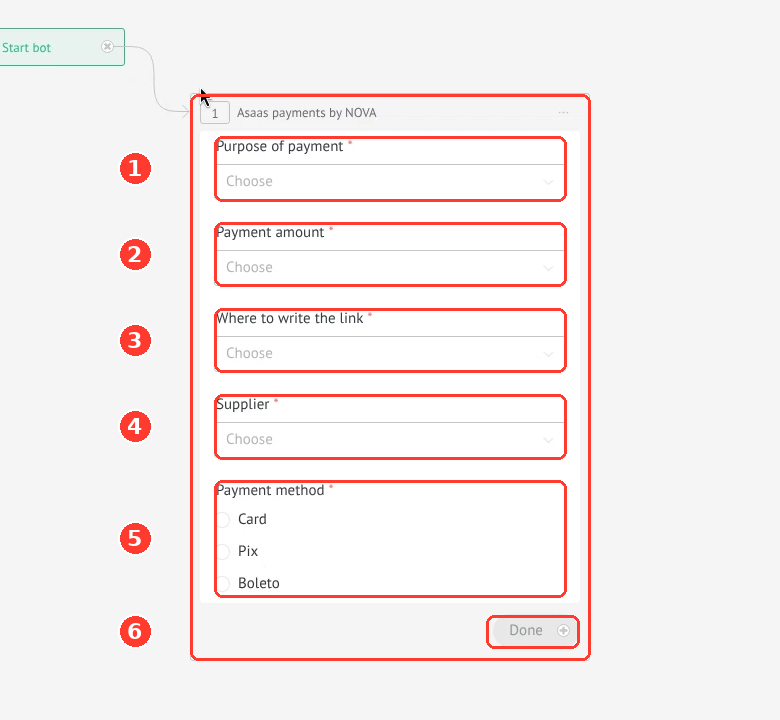
In Salesbot, add the Asaas step. The fields are the same as in the trigger: Purpose of payment, Payment amount, Where to write the link, Supplier and Payment method (Card, Pix or Boleto). Fill them in and continue the bot.

Salesbot designer: Asaas step with Purpose of payment, Payment amount, Where to write the link, Supplier and Payment method

After payment

After the customer pays, Asaas notifies the widget. The invoice status becomes Paid, and the Paid, Asaas field in the lead is filled. The payment link also appears as a note in the lead feed.
Lead feed: note with the Asaas payment link, and the Paid, Asaas field filled

The widget itself does not move the lead to another stage and does not refund payments. If you want to move the lead after payment, add a standard Kommo trigger when the invoice is paid.

CPF, CNPJ and phone

To create a payment, the payer must have a phone number and a Brazilian tax number: CPF (11 digits) on the contact, or CNPJ (14 digits) on the company. When you open the widget settings, the widget creates the CPF and CNPJ fields if they are not there yet.

If CPF or CNPJ is missing, the widget adds a note to the lead, for example: “The payer's CPF or CNPJ is required to pay with Asaas.” The payment page also shows an error. The language of the note follows the language of the responsible user; if that user has no language set, the account language is used.

Lead feed: note that CPF or CNPJ is required to pay with Asaas